Difference between revisions of "Simulations and Backgrounds"
Jump to navigation
Jump to search
| Line 41: | Line 41: | ||
* From above paper, use '''Livermore''' Electromagnetic Physics List (for Hadronic Physics: ''FTFP_BERT'') | * From above paper, use '''Livermore''' Electromagnetic Physics List (for Hadronic Physics: ''FTFP_BERT'') | ||
| − | |||
| − | |||
<option name="PHYSICS" value="FTFP_BERT + LIV"/> | <option name="PHYSICS" value="FTFP_BERT + LIV"/> | ||
Revision as of 14:32, 22 December 2015
GEANT4 vs. Experimental Data
- Benchmarking of monte carlo simulation of bremsstrahlung from thick targets at radiotherapy energies
B. A. Faddegon, M. Asai, J. Perl, C. Ross, J. Sempau, J. Tinslay, and F. Salvat. Med. Phys. 35 (2008) 4308 [1] media:MedPhys.35.4308.pdf
GEANT4 Simulation
- Bubble Chamber STEP file (change .txt to .stp): media:BubbleChamber.txt
- Beamline STEP file (change .txt to .stp): media:Beamline_STEPFile.txt
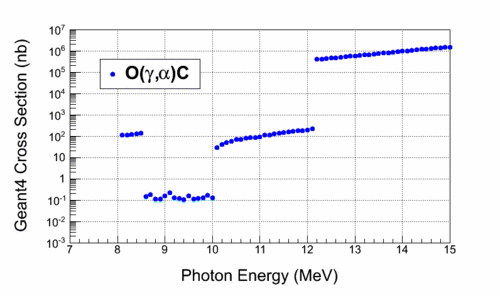
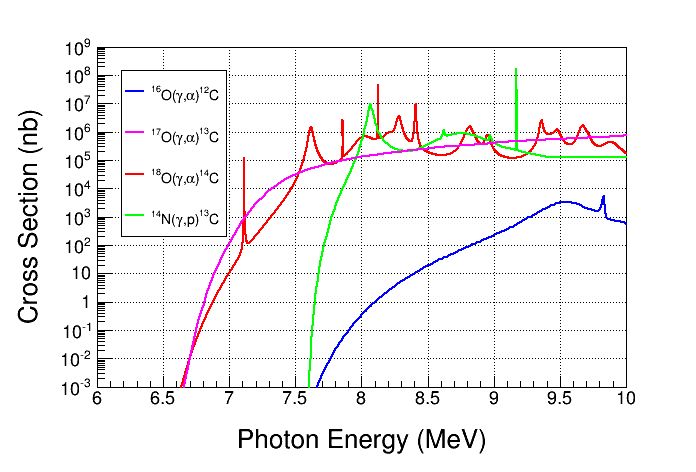
- GEANT4 Photon-Inelastic Model: CHIPS Gamma Nuclear has this (wrong) cross section for our reaction:
gemc - Now (Fall 2015)
- We will use GEant4 Monte Carlo GEMC: [2]
- To try:
- $ ssh ifarm
- $ mkdir /group/bubble/<user>
- $ cd /group/bubble/<user>
- $ setenv JLAB_ROOT /site/12gev_phys (for more details, see [3])
- $ setenv JLAB_VERSION 1.3
- $ source $JLAB_ROOT/$JLAB_VERSION/ce/jlab.csh
- $ gemc
- gemc help media:gemc-help-all.txt:
- gemc -help-all
- Simple Geometry and Material Tutorial: [4]
- From above paper, use Livermore Electromagnetic Physics List (for Hadronic Physics: FTFP_BERT)
<option name="PHYSICS" value="FTFP_BERT + LIV"/>
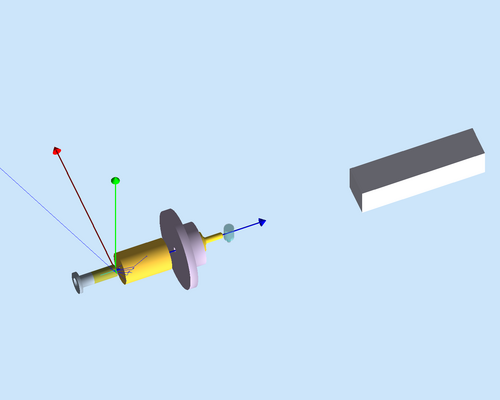
- Drawings used to generate gemc Bubble Chamber Model:
- Beamline Drawings:
- Copper Radiator: media:JL0015733_CU_RADIATOR_WINDOW_ASSY.pdf
- Copper Collimator: media:JL0015777_CU_COLLIMATOR.pdf
- Photon Dump: media:JL0009386_ALUMINUM_PHOTON_BEAM_DUMP.pdf
- Bubble Chamber Drawings:
- High Pressure Vessel: media:NPD-20-001-R1.pdf
- Pressure Vessel Blank Flange: media:NPD-20-002.pdf
- Gamma Beam Window: media:NPD-20-011.pdf
- Blank Flange MOD - Gamma Port: media:NPD-20-014.pdf
- Glass Cell - Metal Adapter: media:NPD-21-106.pdf
- Bubble Chamber Dimensions: media:Bubble_Chamber_Reference_Dimensions.pdf
- How to start with git (DONE ONCE when you start working on this project):
- Done once at the beginning on web:
- Create an account (user-name and password) at https://github.com/
- Fork gemc/detectors
- Done once at the beginning in your work directory:
- $ ssh ifarm
- $ git clone https://github.com/your_git_user_name/detectors.git (create your disk copy)
- $ git config --global user.name "Your Name"
- $ git config --global user.email your_git_email@example.com
- Done once at the beginning to add the master to your disk:
- $ cd detectors/injector/
- $ git remote add upstream https://github.com/gemc/detectors
- $ git remote -v
- $ git fetch upstream
- $ git checkout master
- To update your fork at github.com:
- $ git add newfile (if any)
- $ git commit -a -m"comment"
- $ git push
- To ask the project manager to incorporate your changes into the “master":
- First, update your fork at github.com – see above
- Create pull request: done from github website, navigate to your fork – create pull request by pushing green button
- To update your disk copy from master - see detailed instructions at http://gemc.github.io/ :
- $ git fetch upstream
- $ git checkout master
- $ git merge upstream/master (sync your files at disk with the master: https://github.com/gemc/detectors.git)
- How to run gemc:
- $ cd detectors/injector
- $ setenv JLAB_ROOT /site/12gev_phys
- $ setenv JLAB_VERSION 1.3
- $ source $JLAB_ROOT/$JLAB_VERSION/ce/jlab.csh
- $ ./geometry.pl config.dat
- $ gemc bubble.gcard -USE_GUI=2
- To check overlaps:
- $ gemc bubble.gcard -USE_GUI=0 -CHECK_OVERLAPS=10
- To draw axes: /vis/scene/add/axes 0 0 0 0.5 m (Draws axes at (x0, y0, z0) of given length and colour – x, y and z will be red, green and blue)
- To print physics summary: gemc bubble.gcard -PHYS_VERBOSITY=10
- To run gemc in batch mode:
- $ gemc bubble.gcard -USE_GUI=0 -N=1000000 -PRINT_EVENT=100000
- To set Tracking Energy Cut (in MeV):
- $ gemc bubble.gcard -USE_GUI=0 -N=1000000 -PRINT_EVENT=100000 -ENERGY_CUT=4.0
- To run large statistics run (using LUMI events):
       <option name="LUMI_EVENT"     value="10000, 250*ns, 2*ns" />
       <option name="LUMI_P"         value="e-, 8.5*MeV, 0.*deg, 0.*deg" />
       <option name="LUMI_V"         value="(0.,0.,-5.)cm" />
       <option name="LUMI_SPREAD_V"  value="(0.0, 0.)cm" />
- $ gemc bubble.gcard -USE_GUI=0 -N=10001 -PRINT_EVENT=100
- To convert to root:
- $ $BANKS/bin/evio2root -INPUTF=out.ev -B=bubble
- The current geometry for the Bubble Chamber is in gemc and is shown below:
First Attempt - Spring 2014
- Quick start for the simulation: media:G4_BubbleEx_README.txt. There is also a README file that comes with the example.
- Bubble Chamber GEANT4 Example (change .txt to .tar): media:BubbleEx96.txt
Second Attempt - Summer 2014
- Use github.com to manage the simulation software
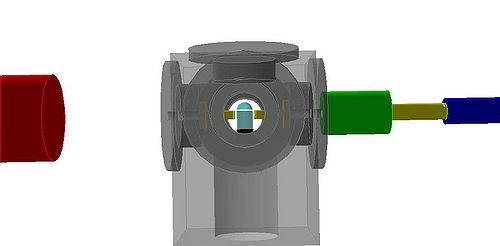
- The current geometry for the Bubble Chamber is in gdml and is shown below:
Using ifarm
- Login remotely to the JLab gateway: $ ssh login.jlab.org
- Connect to either ifarm or Jlabl4:
- $ ssh ifarm
- $ ssh jlabl4
- Load Geant4 and ROOT Environments by running the following commands: (needed every login) (see [5] for more details)
- $ source /site/12gev_phys/production.csh 1.1
- Should see a short list of programs such as ROOT and Geant4 listed:
> Common Environment Version: <1.1>  (Mon, 20 Oct 2014)
> Running as suleiman on ifarm1401
> OS Release:    Linux_CentOS6.5-x86_64-gcc4.4.7
> JLAB_ROOT set to:     /site/12gev_phys
> JLAB_SOFTWARE set to: /site/12gev_phys/1.1/Linux_CentOS6.5-x86_64-gcc4.4.7
> CLHEP   version: 2.1.3.1
> XERCES  version: 3.1.1
> QTDIR   version: system
> Geant4  version: 4.9.6.p03
> ROOT    version: 5.34.13
> GEMC    version: 2.1
> JANA    version: 0.7.2
> Build   version: 1.1
> EVIO    version: 4.0
> Banks   version: 1.0
Compiling Simulation
- Simulation is available at https://github.com/JeffersonLab/BubbleEx
- Create directory for simulation (on JLab nodes can use /group/bubble/ directory):
- $ mkdir /group/bubble/<user>
- $ cd /group/bubble/<user>
- $ git clone https://github.com/JeffersonLab/BubbleEx.git
- $ cd BubbleEx
- $ git pull (to update files from github)
- $ mkdir build
- $ cd build
- $ use cmake (only if using JLab nodes)
- $ cmake ..
- $ make
- $ cd ..
Running Simulation
- In the install directory
- $ build/BubbleEx (remember to run the source command before running)
- Terminal will list what has been loaded and then display output command box
- In session run:
- $ /vis/open OGL
- $ /run/beamOn 100
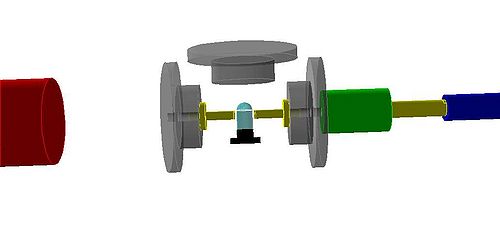
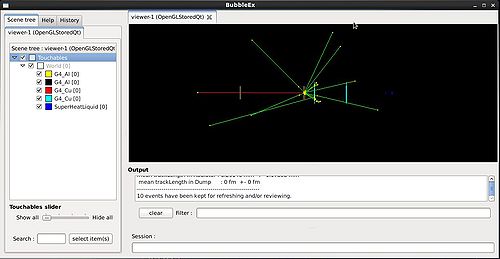
- Initial run of the simulation is shown:
To-do List
- Geometry is in gdml format, need to get correct Radiator, Collimator, Beamline, PhotonDump geometry.
- Add sweep magnet and electrondump geometry in gdml format.
- Complete: Include the Bubble Chamber geometry using the Bubble Chamber STEP file (change .txt to .stp): media:BubbleChamber.txt.
- Geometry has been created and is on github, BubbleMother.gdml and all daughter files
- The beamline STEP file will be ready very soon.
- GEANT4 uses models that calculate wrong photo–nuclear cross sections (see above). GEANT4 does not allow for user’s cross sections. What to do?
- Use GEANT4 to produce the photon spectra impinging on the superheated liquid.
- Fold the above photon spectra with our cross sections in stand-alone codes.
- Could we not create a correct physicslist.cc in geant4 instead?
Relevant Theoretical Cross Sections
- Photo-Nuclear Cross Sections:
- 16O(γ,α)12C media:cs16Oga.txt (Eg (MeV), Cross Section (b))
- 17O(γ,α)13C media:cs17Oga.txt
- 18O(γ,α)14C media:cs18Oga.txt
- 14N(γ,p)13C media:cs14Ngp.txt
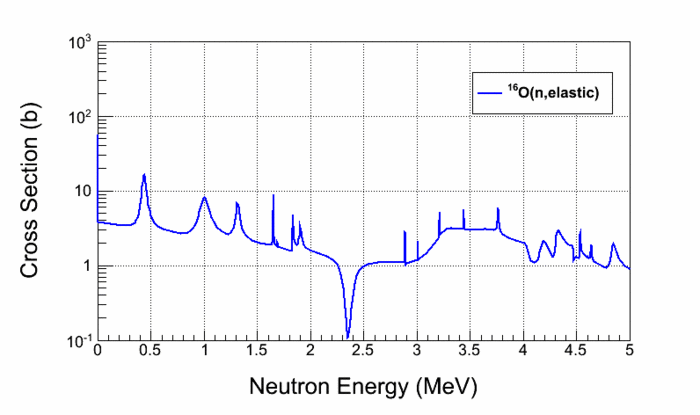
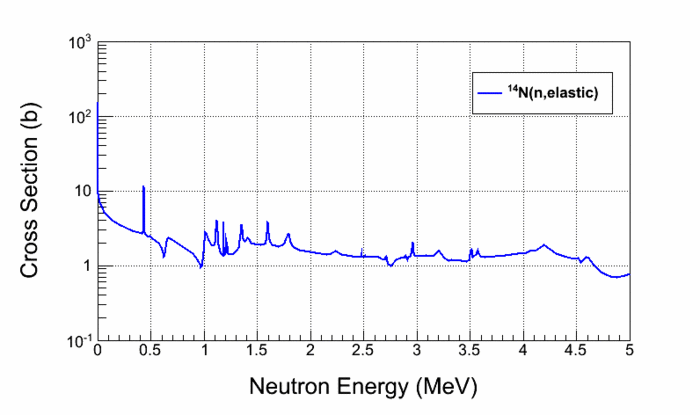
- Neutron Elastic Cross Sections:
- 16O(n,n) media:cs16Onn.txt (En (MeV), Cross Section (b))
- 14N(n,n) media:cs14Nnn.txt
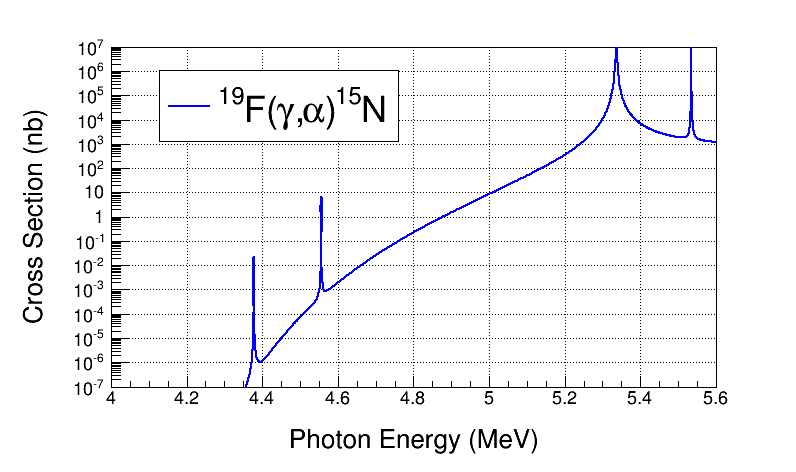
- Fluorine Cross Section:
- 19F(γ,α)15N media:cs19Fga.txt (Eg (MeV), Cross Section (b))
