Deploy ERSAP data pipelines on EJFAT nodes via JIRIAF
Jump to navigation
Jump to search
Deploy ERSAP Data Pipelines Workflows on EJFAT Nodes
This guide explains how to use the Helm charts in the main/local-ejfat/job folder to deploy ERSAP data pipeline workflows on EJFAT nodes.
Prerequisites
- Helm 3 installed
- Kubernetes cluster access
- kubectl configured
Chart Structure
The main chart is located in the job/ directory. Key files include:
Chart.yaml: Metadata for the chartvalues.yaml: Default configuration values- Templates in the
templates/directory
Step-by-Step Usage
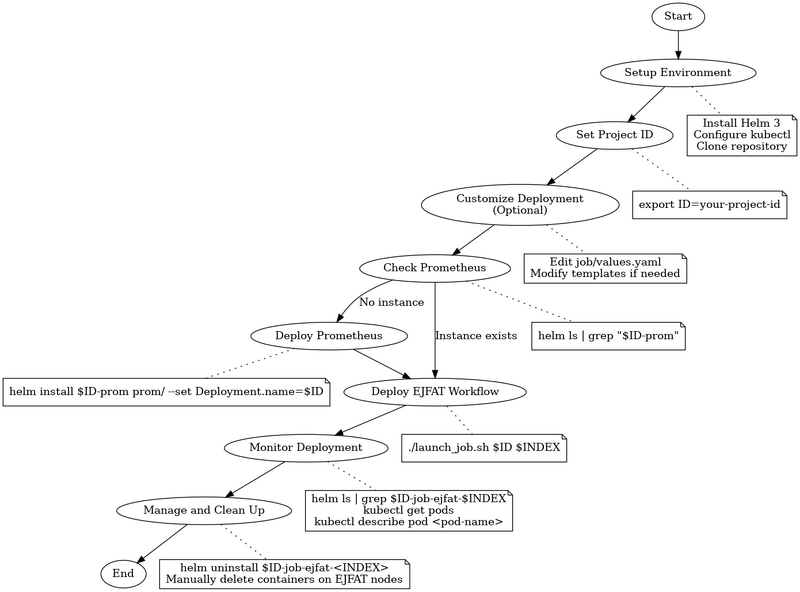
This diagram provides a visual representation of the steps involved in setting up and deploying ERSAP workflows using the Helm charts in this repository.
1. Setup Environment
- Ensure you have Helm 3 installed, access to a Kubernetes cluster, and kubectl configured.
- Clone the repository and navigate to the
local-ejfatfolder:
git clone https://github.com/JeffersonLab/jiriaf-test-platform.git
cd jiriaf-test-platform/main/local-ejfat
2. Set Project ID
- Export your project ID as an environment variable:
export ID=your-project-id # e.g. jlab-100g-nersc-ornl
3. Customize Deployment (Optional)
- Edit
job/values.yamlto customize your deployment. Key settings include:
Deployment:
  name: this-name-is-changing
  namespace: default
  replicas: 1
  serviceMonitorLabel: ersap-test4
  cpuUsage: "128"
  ejfatNode: "2"
ersapSettings:
  image: gurjyan/ersap:v0.1
  cmd: /ersap/run-pipeline.sh
  file: /x.ersap
- For more advanced customization, consider modifying the template files in the
job/templates/directory:job-job.yaml: Customize the Kubernetes Job specificationjob-configmap.yaml: Adjust the scripts for job containersjob-service.yaml: Modify the Kubernetes Service configurationprom-servicemonitor.yaml: Fine-tune Prometheus monitoring settings
4. Deploy Prometheus (If not already running)
- Refer to
main/prom/readme.mdfor instructions on how to install and configure Prometheus. - Check if the prometheus instance is running:
helm ls | grep "$ID-prom"
If the command returns no results, it means there's no Prometheus instance for your project ID.
- Install a Prometheus instance for your project if it's not already running:
cd main/prom
helm install $ID-prom prom/ --set Deployment.name=$ID
5. Deploy EJFAT Workflow
- Use the
launch_job.shscript to deploy the EJFAT workflow:
cd main/local-ejfat
ID=jlab-100g-nersc-ornl
INDEX=2
./launch_job.sh $ID $INDEX
- The script uses the following variables:
ID: The project identifier (e.g., jlab-100g-nersc-ornl)INDEX: A unique index for the job (e.g., 2)
6. Monitor Deployment
- Check Helm release:
helm ls | grep $ID-job-ejfat-$INDEX - Check pod status:
kubectl get pods - Describe a pod:
kubectl describe pod <pod-name>
7. Manage Deployed Jobs and Clean Up Workflows
- List deployed jobs:
helm ls - Delete a deployed job:
helm uninstall $ID-job-ejfat-<INDEX>
- After uninstalling the Helm release, manually delete containers on EJFAT nodes:
- Log in to each EJFAT node used in your deployment.
- List all containers:
docker ps -a - Identify containers related to your job.
- Remove these containers:
docker rm -f <container-id>
