Jupyter via VSCode remote-ssh with singularity on ifarm
Here are instructions for configuring your local VSCode to connect to the ifarm via ssh and run an ipython kernel inside a singularity container.
Get a yubikey
If you don't already have one, it is well worth stopping by the helpdesk and getting a yubikey USB device. It is not strictly required, but can save a lot of hassle typing numbers you get from your MFA app on your phone.
Configure SSH on your local computer
Logging into an ifarm computer requires first logging into the scilogin.jlab.org gateway. Configuring your local computer to do a proxy jump will make this a lot easier. Instructions for this can be found in the JLab knowledge base article here:
Follow those instructions so that "ssh ifarm" works from your local computer.
Next, add the following to your ~/.ssh/config file. This configures it so when you ssh to the special host "epsci-ubuntu-22.04~ifarm" it will not only tunnel you all of the way into the ifarm, but will run the specificed singularity container and drop you into it.
 # https://github.com/microsoft/vscode-remote-release/issues/3066#issuecomment-1019500216
 #
 Host epsci-ubuntu-22.04p1~ifarm
   HostName ifarm.jlab.org  # use specific ifarm node rather than generic "ifarm"
   ProxyJump scilogin.jlab.org
   RemoteCommand singularity shell --bind /u,/group,/w,/work /cvmfs/oasis.opensciencegrid.org/jlab/epsci/singularity/images/epsci-ubuntu-22.04p1.img
   RequestTTY yes
Test that this works by doing:
ssh epsci-ubuntu-22.04p1~ifarm
This should result in a "Singularity>" prompt that you can confirm is the correct OS by looking at either the /etc/os-release file or the Dockerfile in the /container directory.
Note that the "--bind /u,/group,/w,/work" option mounts the group work disks inside the container so you can use them. Add any other directories (e.g. /cvmfs) you may need (Note that your home directory is automatically mounted).
Unsupported ssh option "remotecommand"
If you get an error about "remotecommand" it is likely due to the openssh version being too old. You need at least openssh7.6 (RHEL7.9 comes with openssh7.4). If you are using a Linux computer and have sudo access here is a quick solution:
 curl -O https://mirror2.sandyriver.net/pub/OpenBSD/OpenSSH/portable/openssh-9.3p1.tar.gz
 tar xzf openssh-9.3p1.tar.gz
 cd openssh-9.3p1
 ./configure
 make -j8
 sudo make install
This will install the new version of openssh into /usr/local. If you are using tcsh you will need to execute "rehash" in any open terminals (new terminals will be OK).
Try running the ssh epsci-ubuntu-22.04p1~ifarm command again to make sure it works.
Using work directories for large software installations
It is easy to overfill the quota on your CUE home directory by having VScode extensions and python environments install lots of packages. Redirecting these to the work disk can save a lot of headache. There are actually a few ways to deal with this depending on which python kernel/environment you select.
Using a global environment
Both VSCode and JLab JupyterHub may install python packages in hidden directories in your home directory. These count against your quota and can easily fill it sneakily without you knowing until it is too late. It is best to deal with this now by creating symbolic links in your home directory that point to directories on the work disk where these packages can be installed.
There are a couple of directories to be concerned with. Here are some commands to execute on the ifarm, that will set up the appropriate links. Replace "epsci" with the name of whatever work disk is appropriate. Note that if these directories already exist in your home directory, you may want to rename them or remove them to make way for this method.
 mkdir -p /work/epsci/${USER}/home_dot_local
 mkdir -p /work/epsci/${USER}/home_dot_cache
 mkdir -p /work/epsci/${USER}/home_dot_vscode-server
 ln -s /work/epsci/${USER}/home_dot_local ~/.local
 ln -s /work/epsci/${USER}/home_dot_cache ~/.cache
 ln -s /work/epsci/${USER}/home_dot_vscode-server ~/.vscode-server
The above will install any VScode extensions on the remote system (i.e. ifarm) into the /work/epsci/${USER}/home_dot_vscode-server directory.
Python packages installed using pip while in a JLab Jupyter session (not necessarily when using VScode) will get installed into the /work/epsci/${USER}/home_dot_local ~/.local and /work/epsci/${USER}/home_dot_cache ~/.cache directories.
VScode lets you specify a python virtual environment on a workspace-by-workspace basis so to make sure those end up on the work disk will take another couple of steps (see "Customized Python Virtual Environment" section below).
Configuring VScode
First, install the necessary extensions in your local VScode.
- Click the extensions icon on the left side of the window (the 4-boxes icon)
- Type "remote" into the search entry in the top
- Install the "Remote - SSH" extension
The above should automatically install the "Remote Explorer" extension as well which will add an icon to the left side of the VSCode window (monitor with circle in lower right).
Second, configure VSCode to use the "RemoteCommand" configuration option in your ssh config file.
- Open the command palette using Cmd+shift+P or from the gear menu in the bottom left of the window
- Type "settings.json" and then select Preferences: Open User Settings (JSON)
- Add the following to your settings and save (if you have other settings already, be sure to add a comma to the line before this one!):
 {
   "remote.SSH.enableRemoteCommand": true
 }
Click on the "Remote Explorer" extension icon on the left side of the window (monitor with a circle in lower right) to open. You should see the "epsci-ubuntu-22.04~ifarm" item. Hover over it to see options to either connect the current window (arrow) or open a new window (box). Choose either option to get a connected window. Watch for a small entry box at the top of the window that is asking for your password. Enter your PIN+OTP to login. (OTP=One Time Password from either your yubikey or phone app).
It will automatically install some extensions on the remote host under ~/.vscode-server.
You can verify that it is working correctly by opening a new terminal in VSCode and seeing that it gives the "Apptainer>" prompt.
Customized Python Virtual Environment
VSCode will provide kernel options to use with Jupyter which correspond to different python environments. You can create new virtual environments through the VSCode interface. When you do this, it will create a directory called .venv in the current workspace directory the VSCode window is using. Installing many of the standard python packages (tensorflow, pytorch, pandas, matplotlib, etc....) will take up several GB of space. It is better if this can be stored in one central location and all of your workspaces use it.
One easy way to do this is:
- create a workspace with a new Jupyter notebook
- create a new python virtual environment (this will create a .venv directory in the workspace directory)
- install the python packages via the VSCode Jupyter interface
- move the .venv directory to a central location
For the second step above, you can run a cell in the Jupyter notebook with these contents:
%pip install pandas numpy matplotlib tensorflow torch
You can specify a directory to VSCode on the the ifarm where you keep your own virtual environments using the "python.venvPath" configuration setting. To set this, open the command palette (Cmd+shift+P or the gear icon in lower left of the VSCode window). Type "settings" and then select the "Preferences: Open Remote Settings (JSON) (SSH: epsci-ubuntu-22.04~ifarm)" option. Enter something like the following in the settings, replacing the path with where you keep your virtual environments.
 {
   "python.venvPath":"/work/epsci/davidl/python_venvs"
 }
Save the settings file and go back to a Jupyter notebook. You should now be able to navigate to "Python Environments..." when selecting a kernel and you should see all of the virtual environments in the directory specified in the settings.
NOTE: If after saving the settings, the "python.venvPath" seems greyed out and hovering over it indicates it is unsed, you may need to upgrade to a newer version of VSCode. This issue is accompanied by the "Pylance" extension being greyed out in the "SSH: EPSCI-UBUNTU=22.04~IFARM" section of the extensions pane. This problem was present in VSCode 1.76 but was resolved when I upgraded to VSCode 1.79.
Open Jupyter notebook and select kernel
You should now be able to navigate the remote system in VSCode to either open an existing notebook, or create a new. Once you do, the "Select Kernel" option will be available in the top right corner of the VScode window. The first time you do this, it will have an option at the top of the window to "Install suggested extensions Python + Jupyter". Select this to install those extensions on the remote system.
Once the remote extensions are installed, click on "Select Kernel" again and a menu with different options will appear at the top of the window. Select the "Python Environments..." option. If you followed the instructions above, you will be able to select one of you own python virtual environments to use for the notebook.
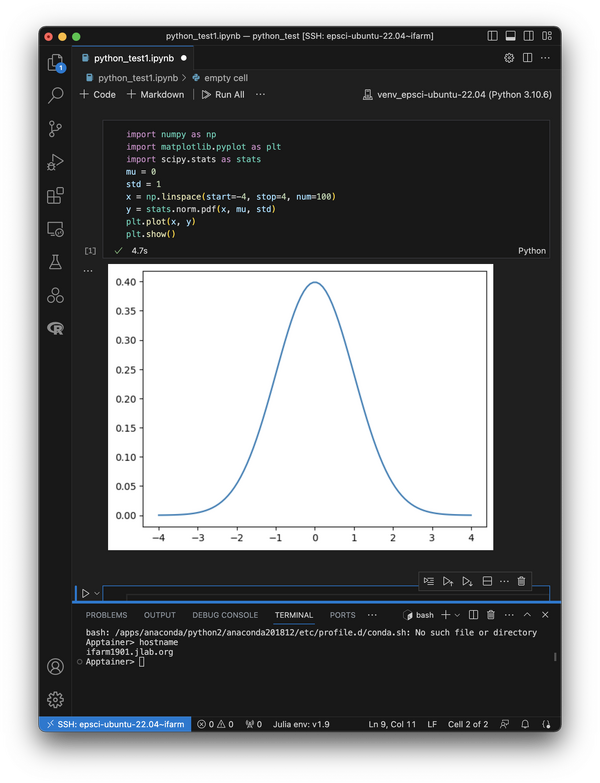
At this point you can test that everything is working with a simple code snippet like this:
import numpy as np
import matplotlib.pyplot as plt
import scipy.stats as stats
mu = 0
std = 1
x = np.linspace(start=-4, stop=4, num=100)
y = stats.norm.pdf(x, mu, std)
plt.plot(x, y)
plt.show()
Using a Julia Notebook
Jupyter supports many languages, including julia. You can configure VSCode to use use a Julia interpreter in a Jupyter notebook.
Step 1: Install the Julia extension in the remote VSCode server. Go to a VSCode window that is connected to the "SSH: epsci-ubuntu-22.04~ifarm" host (or whichever remote host you wish to use). Click on the extensions icon on the left of the window and type "Julia" at the top to find the Julia extension and install it. Note that the Jupyter extension should already be installed on the remote system via the instructions in previous sections.
Step 2: Configure VSCode to find the Julia interpreter. Do this by setting the "julia.executablePath" on your remote system:
- Open command palette (Cmd+shift+P)
- Type "settings" and select "Preferences: Open Remote Settings (JSON) (SSH: epsci-ubuntu-22.04~ifarm)"
- Add the julia.executablePath setting it to the full path to the julia executable. Here is an example. Note that this also includes the path to my python venvs used with Jupyter.
 {
     "python.venvPath":"/work/epsci/davidl/python_venvs",
     "julia.executablePath":"/group/epsci/apps/Julia/julia-1.9.1/bin/julia"
 }
Note that you can install your own Julia binaries and point to them instead.
Step 3: Make a symlink so Julia packages install to a work disk instead of your home directory. This saves filling your home directory quota as described above for python. Below is how I did it. Adjust to the work disk location of your preference.
mkdir /work/epsci/${USER}/home_dot_julia
ln -s /work/epsci/${USER}/home_dot_julia ~/.julia
Step 4: Create a Julia Jupyter notebook. At this point if you select "New File..." from the VSCode window you should see a new option to create a new Julia file. If you don't, then try disconnecting the VSCode remote-ssh session and reconnecting.
If you want to use Jupyter, then don't create a Julia file, but instead select "Jupyter Notebook .ipynb support". This will create a new Jupyter notebook in which you can select to use either the "Julia 1.9.1" kernel or one of your python kernels.
NOTE: It seems the ".ipynb" suffix is the only one allowed by the VSCode Jupyter extension, even if the notebook is a Julia notebook!
Julia uses some python packages for plotting via PyCall. It seems this defaults to using /usr/bin/python3 instead of the virtual environment you may have created. This will cause an error when Julia tries to use the matplotlib package because it is not installed at the system (i.e. container) level. To resolve this, you need to specify the python julia should use when calling PyCall. It seems this requires recompiling PyCall itself. Do this by creating cell in a Julia notebook with contents similar to this and executing it:
import Pkg

ENV["PYTHON"]="/work/epsci/davidl/python_venvs/venv_epsci-ubuntu-22.04/bin/python3"
Pkg.build("PyCall")

# Go ahead and install some other packages while here
# (n.b. package installation only need to be done once)
Pkg.add("Plots")
Pkg.add("GR")
You should not need to do this more than once since the newly installed PyCall will now have the python venv location. This is not really ideal since it locks in the specific python venv. There may be a better way, but this at least works.
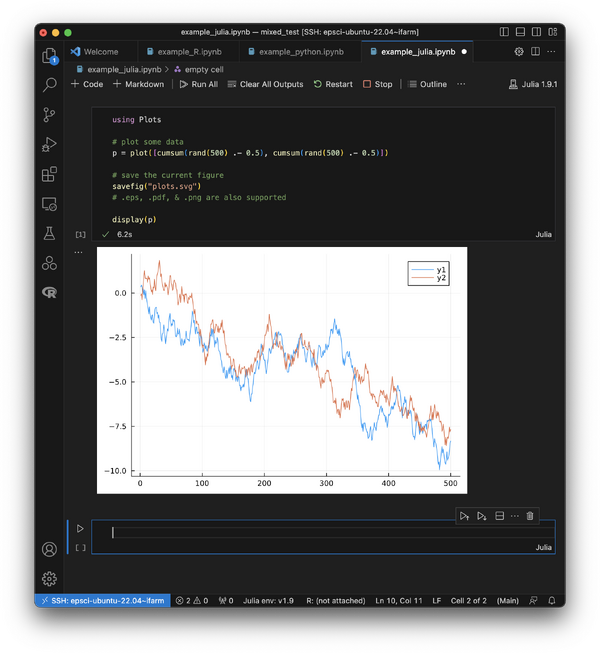
Finally, you should be able to generate graphics using a Julia notebook. Below is some example Julia code that you can paste into a cell and execute. The first time you run this, the package installs may take\ a while.
using Plots

# plot some data
p = plot([cumsum(rand(500) .- 0.5), cumsum(rand(500) .- 0.5)])

# save the current figure
savefig("plots.svg")
# .eps, .pdf, & .png are also supported

display(p)
Here is a screencap of the working notebook:
Using an R Notebook
First, you need to have a version of R installed and accessible. A new epsci-ubuntu-22.04p1 image was produced that includes R for this purpose. To use it, simply modify your ~/.ssh/config file to use that image instead:
 # https://github.com/microsoft/vscode-remote-release/issues/3066#issuecomment-1019500216
 #
 Host epsci-ubuntu-22.04~ifarm
   HostName ifarm.jlab.org
   ProxyJump scilogin.jlab.org
   RemoteCommand singularity shell --bind /u,/group,/w,/work /cvmfs/oasis.opensciencegrid.org/jlab/epsci/singularity/images/epsci-ubuntu-22.04p1.img
   RequestTTY yes
Test that this works by connecting or reconnecting your VSCode window to the remote container and typing "R --version" in the terminal.
Second, set your system up to install packages to the work disk so you don't fill the quota in your home directory. This can be done by doing something like this while on ifarm:
 mkdir -p /work/epsci/davidl/R_installed_packages
 echo '.libPaths("/work/epsci/davidl/R_installed_packages")' >> ~/.Rprofile
Check that it added the path to the front of your .libPaths by doing the following:
 R
 .libPaths()
 q()
The second command should return a list of directories with your "R_installed_packages" directory first in the list.
n.b. R will not add a directory to .libPaths that does not already exist or that you don't have write permission to!
Third, make sure the IRkernel package is installed. This is already done as an ubuntu system package for the singularity container specified above. Test for it by going to the VSCode terminal and typing:
 R
 IRkernel::installspec()
If the above returns without error (it doesn't print anything) then you are good to go. If you need to install it then you can do so from the VSCode terminal by running R. Install the IRkernel package like this:
install.packages("IRkernel")
At this point you should be able to create a new Jupyter notebook (not an "R document"!). Select:
Select Kernel -> Jupyter Kernel ... -> R /R
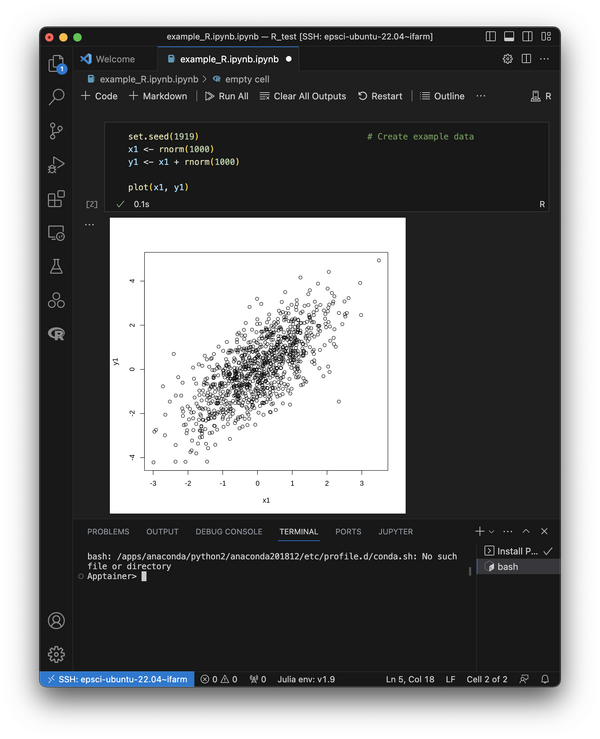
In the first cell, enter some example code to make a plot using R like this:
 set.seed(1919)  # Create example data
 x1 <- rnorm(1000)
 y1 <- x1 + rnorm(1000)

 plot(x1, y1)
Using C++ in a Notebook
To use C++ in a jupyter notebook you'll need to install the xeus-cling package via conda. Conda is available as either miniconda or anaconda, neither of which is installed in the ubuntu singularity container. Here are instructions for installing miniconda and then using it to install xeus-cling.
Step 1: Get the Miniconda install script and run it. Note that the following will install the conda packages in the directory specified with the -p option. If you don't give that option, it will default to ~/.conda in your home directory. There are two potential issues with that: 1. The singularity container is likely using a different OS than ifarm (e.g. ubuntu vs. RHEL). Thus, the binaries may not be compatible if you ever use conda on ifarm outside of singularity/apptainer. It is best to try and keep them separate 2. you can fill your home directory quota.
curl -O https://repo.anaconda.com/miniconda/Miniconda3-latest-Linux-x86_64.sh
bash ./Miniconda3-latest-Linux-x86_64.sh -b -p /work/epsci/${USER}/conda_ubuntu_22.04
WARNING: This will automatically add a line to your ~/.conda/environments.txt file. This is good and what you want when using the singularity/apptainer. It may cause issues if using the native ifarm OS (e.g. RHEL).
Step 2: Activate the conda environment, create a dedicated conda environment for this, and install the xeus-cling package into it.
source /work/epsci/${USER}/conda_ubuntu_22.04/bin/activate
conda create -y -n xeus-cling
conda activate xeus-cling
conda install -c conda-forge xeus-cling
This will take a while to install everything. Once it is done though you should be set. This will automatically add a line to your ~/.conda/environments.txt file pointing to the new environment so jupyter in VSCode will find it.
NOTE: If you are trying to do this on a different JLab computer (e.g. your office desktop) and get an SSL error suggesting a certificate issue, you can do the following to grab the JLab CA certificate and register its location with conda.
cd
curl -O http://pki.jlab.org/JLabCA.crt
conda config --set ssl_verify ~/JLabCA.crt
If it still doesn't work, then you can try using the --insecure option with conda install.
Step 3: Open a new Jupyter Notebook in VSCode (not a new C++ file) and click "Select Kernel" and then "Jupyter Kernel" and then one of the C++ kernels from the list. Enter in a simple "Hello World!" program into the top cell and run it. Note that you do not need to put it inside a main() function, but you do need to include the header.
#include <iostream>

std::cout << "Hello World!" << std::endl;
The above is all well and good, but to do much useful, you need to link in external libraries and include their headers. Here is how you can do this with JANA2. Go to a terminal in VSCode so you are running inside an apptainer. The first part will install cmake since for some reason, it is not included in the ubuntu 22.04 image (who could be so careless as to leave that out!)
source /work/epsci/${USER}/conda_ubuntu_22.04/bin/activate
conda install -y -c conda-forge  cmake
cd /work/epsci/davidl/2023.06.18.vscode_jupyter/C++  # replace with your working directory
git clone https://github.com/JeffersonLab/JANA2
cmake -S JANA2 -B build
cmake --build build --target install -- -j8
ls -d ${PWD}/build/install
The last command will print the full path to the installed JANA2 package and should be copied into the jupyter cell so it looks something like this:
// In the following, replace "<jana_install_path>" with where your JANA is installed
#pragma cling add_library_path("<jana_install_path>/lib")
#pragma cling add_include_path("<jana_install_path>/include")
#pragma cling load("JANA")

#include <JANA/JApplication.h>

JApplication app;
app.GetJParameterManager()->SetParameter("jana:nevents", 10);

app.AddPluginPath("<jana_install_path>/plugins");
app.AddPlugin("JTest");
app.Run();
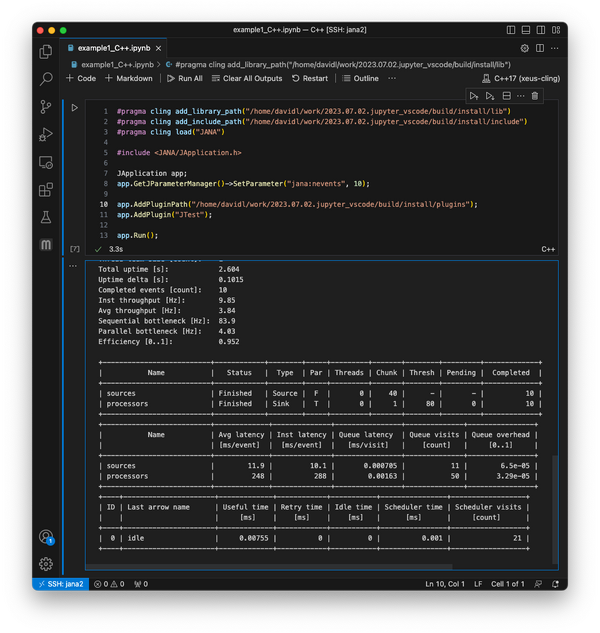
A screencap of the output is here:


